Hyper-V Server 2016 or 2019 Host
Article from: timothygruber.com
All steps in this section are to be done on your Hyper-V Server host server. In this example, I am starting from a fresh install of Hyper-V Server 2016 that is fully patched and up-to-date.
- Install Hyper-V Server 201x
A. Go through the typical install dance:

B. Set a password at first boot.
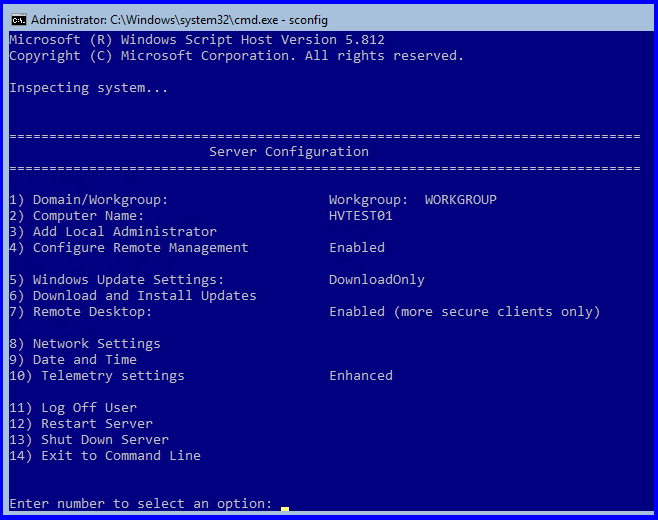
C. Change the computer name in sconfig (option 2).
D. Verify Remote Management is Enabled (option 4).
E. Enable Remote Desktop (option 7).
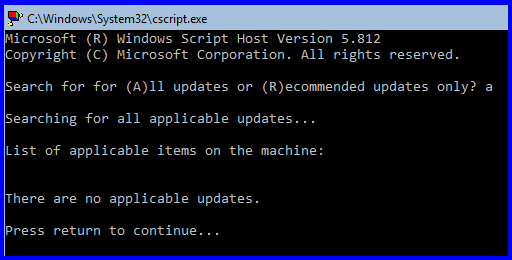
- 2. Run Windows Update and make sure your server is 100% up-to-date. (option 6, then (A)ll updates)
A. This is the most important step, because depending on which patch level Hyper-V Server 2016 is on, versus the patch level of your Windows 10 PC, you WILL get errors and will not be able to remotely connect via Hyper-V Manager.
- 3. Enable PSRemoting:
Enter the following command in an elevated PowerShell window:
Enable-PSRemoting
- 4. Allow remote access on public zones and enable firewall rules for CredSSP and WinRM:
A. Enter the following command in an elevated PowerShell window, then enter Y when prompted:
Enable-WSManCredSSP -Role server

Windows 10 PC
All steps in this section are to be done on your Windows 10 PC. At the time of this article’s creation, I used a fresh installed of Windows 10 Pro 1803 fully patched and up to date as of the end of July 2018. I know, scary! (but working)
- Run Windows Update:
A. This is very important, and depending on which patch level your Windows 10 PC and Hyper-V Server 2016 or 2019 host is on, you WILL get errors and will not be able to remotely manage your Hyper-V host:

2. Install the Hyper-V Management Tools:
A. Open up an elevated PowerShell window (Run as Administrator)
B. Enter the following command, which installs the Hyper-V Management tools, then enter Y to reboot:
Enable-WindowsOptionalFeature -Online -FeatureName Microsoft-Hyper-V-Tools-All -All

3. Set the network connection category to private:
A. Enter the following command in an elevated PowerShell window:
Set-NetConnectionProfile -InterfaceAlias Ethernet -NetworkCategory Private
i. You may need to change “Ethernet” (InterfaceAlias) to match the name of your network connection(s).
ii. You can use Get-NetConnectionProfile to list your connections and their categories.
4. Add the Hyper-V Server host to the local “hosts” file:
A. Enter the following command, which appends the host name of the Hyper-V host and it’s IP address to the local hosts file:
Add-Content -Path C:\Windows\System32\drivers\etc\hosts -Value "`n172.30.32.151`tHVTEST01"
i. The `n is new line
ii. The `t is horizontal tab character
iii. Replace HVTEST01 and 172.30.32.151 with the host name and IP address of your Hyper-V Server host.
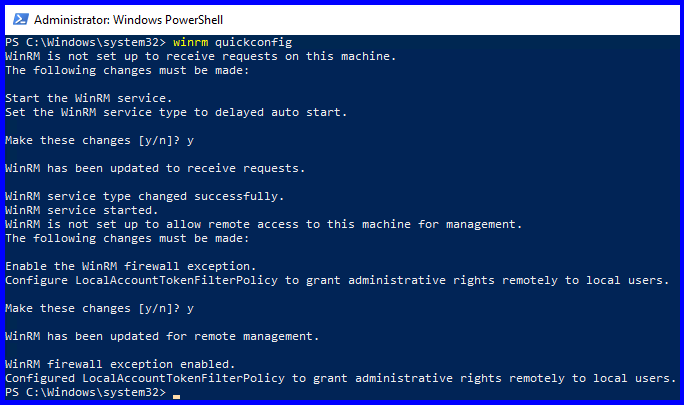
5. Configure Remote Management Service:
A. Enter the following in an elevated PowerShell window, and enter Y when prompted:
winrm quickconfig
6. Add the Hyper-V Server host to the trusted hosts of the Win10 PC:
A. Enter the following command in an elevated PowerShell window, and enter Y when prompted:
Set-Item WSMan:\localhost\Client\TrustedHosts -Value "HVTEST01"

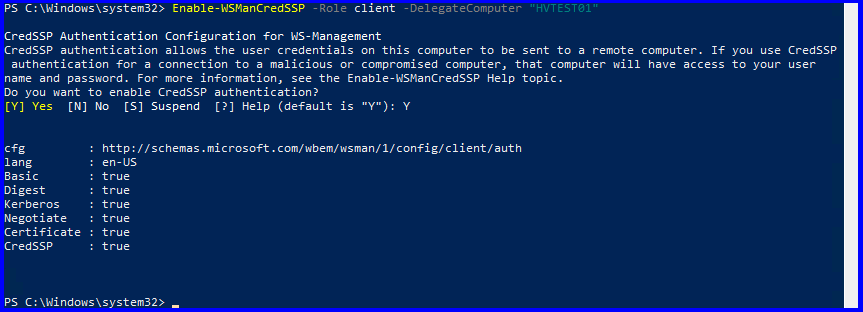
7. Allow the Win10 PC credentials to be delegated to the Hyper-V Server host:
A. Enter the following command in an elevated PowerShell window, enter Y when prompted:
Enable-WSManCredSSP -Role client -DelegateComputer "HVTEST01"
8. Allow delegating fresh credentials with NTLM-only server authentication:
A. Enter the following commands in an elevated PowerShell window:
New-Item -Path "HKLM:\SOFTWARE\Policies\Microsoft\Windows\" -Name 'CredentialsDelegation'
New-ItemProperty -Path "HKLM:\SOFTWARE\Policies\Microsoft\Windows\CredentialsDelegation\" -Name 'AllowFreshCredentialsWhenNTLMOnly' -PropertyType DWord -Value "00000001"
New-ItemProperty -Path "HKLM:\SOFTWARE\Policies\Microsoft\Windows\CredentialsDelegation\" -Name 'ConcatenateDefaults_AllowFreshNTLMOnly' -PropertyType DWord -Value "00000001"
New-Item -Path "HKLM:\SOFTWARE\Policies\Microsoft\Windows\CredentialsDelegation\" -Name 'AllowFreshCredentialsWhenNTLMOnly'
New-ItemProperty -Path "HKLM:\SOFTWARE\Policies\Microsoft\Windows\CredentialsDelegation\AllowFreshCredentialsWhenNTLMOnly\" -Name '1' -Value "wsman/HVTEST01"
B. Or, configure the following local group policy (gpedit.msc)(does the same as above):

i. Change “HVTEST01” to match the name of your Hyper-V host in either of the above steps.
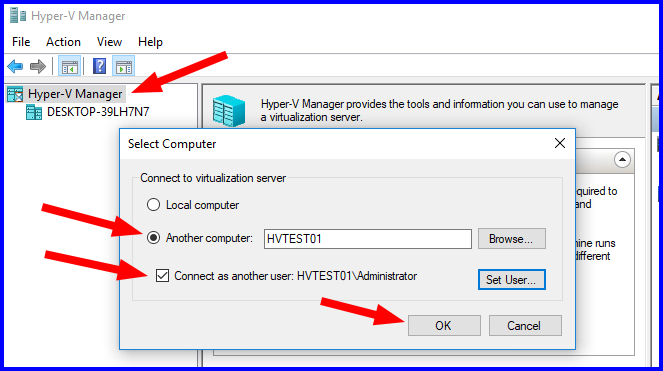
9. Open up Hyper-V Manager:
A. Right-Click on “Hyper-V Manager”, and select “Connect to server…”.
B. Select “Another computer” and type the name of your Hyper-V Server host.
C. Check “Connect as another user”, then use the local admin account of the Hyper-V Host. Check “Remember me”. Use HOSTNAME\Administrator
10. Success!
A. It should now connect successfully, allowing you to mange your Hyper-V Server host, set-up, and configure VMs:
